Wifi and MQTT configuration
Configuration portal
Once loaded into your ESP, and if you don't use the manual configuration, you have to set your network parameters with WiFi Manager portal.
From your smartphone, search for OpenMQTTGateway or OMG_ WiFi network and connect to it without password, or if you are using a device sold by Theengs or the macro -DWM_PWD_FROM_MAC=true, the password will be the last eight digits of the device MAC Address with upper case. Example, the password would be CCDDEEFF for a MAC Address AABBCCDDEEFF. For the Theengs Plug, the MAC Address can be found on the device sticker, and for all the devices, it is printed on the serial monitor logs.
Once connected to the WiFi, a web page should appear. On Android, you may also have a popup asking you if you want to connect to it without an internet connection. Answer yes always/all the time. If the web page doesn't appear, click on the WiFi Access Point and "Manage router".
TIP
For boards with an ethernet port you can also access to the Wifi Manager portal through the LAN board IP address.
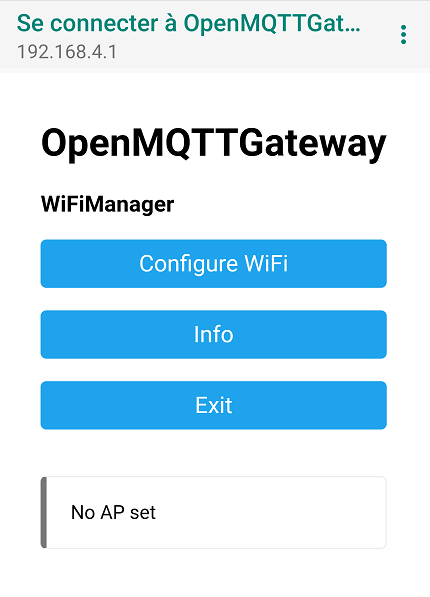
- Click on Configure WiFi
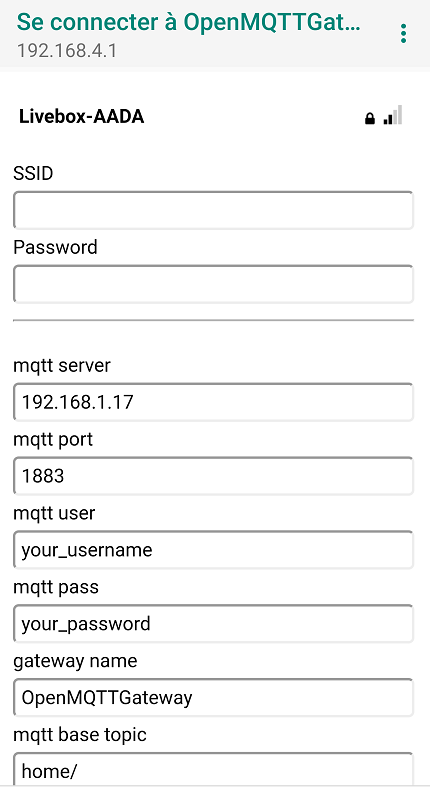
- Select your WiFi
- Set your WiFi password
::: note If the board is connected by ethernet, the Wifi and password can be empty. If you fill them the board will use this wifi as a fallback connectivity method. :::
- Set your MQTT Server IP or domain name (for Home Assistant you can enter
homeassistant.localif your server is configured with mDNS) - Set your MQTT Server Port (default: 1883)
- Set your MQTT Server username (optional, 64 characters maximum)
- Set your MQTT Server password (optional, 64 characters maximum)
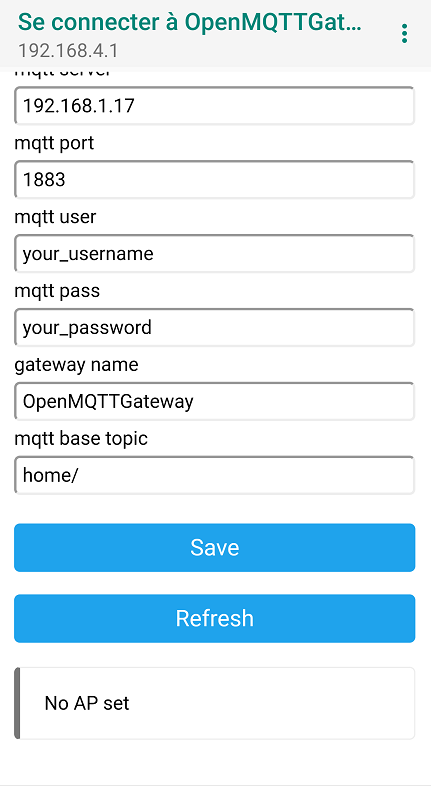
- Set your MQTT base topic if you need to change it (you must keep the / at the end) (default: home/, 64 characters maximum)
- Set your gateway name if you need to change it
- Set your gateway password (default: empty, 8 characters minimum, 64 maximum), this password is used for
- Local and remote OTA
- WebUI login (login:"admin", password: "")
- WiFi Manager Access Point password after initial config
- Set the MQTT secure connection box to select whether or not the connection should be secure
- Set the certificate validation to select wether or not you want to validate the server identity with a certificate
- Copy/paste the MQTT server certificate in the MQTT server cert box (only required if using a secure connection), be sure to include the
-----BEGIN CERTIFICATE-----and-----END CERTIFICATE-----markers - Add your certificates
- Click on save
The ESP restart and connect to your network. Note that your credentials are saved into the ESP memory, if you want to redo the configuration you have to erase the ESP memory with the flash download tool.
Once done the gateway should connect to your network and your broker, you should see it into the broker in the form of the following messages:
home/OpenMQTTGateway/LWT OnlineNote that the web portal appears only on first boot, if you want to configure again the setting you can do a long press on TRIGGER_GPIO, erase the settings or Reset the configuration from the WebUI.
Build time configuration
You can configure your MQTT server credentials and network configuration before building the application. It can be done either in Arduino or in Platformio IDE thought the User_config.h file. Note that with Platformio IDE you can also set your credentials into the platformio.ini file or an *_env.ini file, here is an example with the Olimex ESP32 gateway:
[env:esp32-olimex-gtw-ble]
platform = ${com.esp32_platform}
platform_packages = ${com.esp32_platform_packages}
board = esp32-gateway
board_build.partitions = min_spiffs.csv
lib_deps =
  ${com-esp.lib_deps}
  ${libraries.ble}
build_flags =
  ${com-esp.build_flags}
  '-DZgatewayBT="BT"'
  '-DLED_INFO=33'
  '-DLED_INFO_ON=1'
  '-DESP32_ETHERNET=true'
  '-DMQTT_SERVER="11.22.33.44"'
  '-DMQTT_USER="salut"'
  '-DMQTT_PASS="atoi"'
  '-DGateway_Name="OpenMQTTGateway_ESP32_OLM_GTW"'